TEMPLATES ARE NOW WORKING....YAY!!!!!
There is something about making paperchains or paper dolls....once you start it is hard to stop. So if your kids are driving you crazy with all that excitement before the Big Day and you have too many things to do to help them with a big project...sit them down and get them to start making paperchain decorations. They can be as simple or as elaborate as you want. After some basic instruction they will be off...and soon the house will be covered in Holiday Paper Cheer!!
Materials Required:
paper
scissors
pencil
templates SNOWMAN GINGERBREAD ANGEL PENGUIN SANTA
tape
colored paper
markers
glue stick
any other embellishments that are lying around ie. doilies, sequins, stickers
Cut some paper in half the long way. Now you can use computer paper, construction paper, newspaper, wrapping paper, etc. The possibilities are endless but you want it to be about 4-5 inches wide.
If you need to tape these together. The longer the strip the longer your chain.
Do a quick measurement to figure out where your first fold should be. Rather than trying to divide the whole long strip into segments...I make a mark for the first one. I want it to be 4 and 3/4's of an inch long and then I just start folding. At the end if there is a piece that is too short for another fold I just cut it off. You can always join two chains together. You also don't want it too long when you are decorating it as it gets in the way.
Accordion fold your paper trying to get all the pages to be the same size. If you have an extra piece at the end just cut it off.
Using the templates or making your own design trace it on the paper.
If making your own design just remember they need to be connected either by hands and arms or looped together on a drawn in rope on either side.
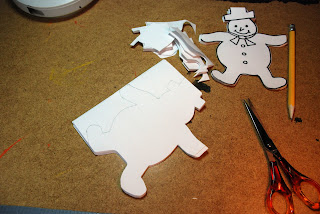
Cut out your design ensuring that the sections on the side where they will be joined are not touched by the scissors.
Open up your chain and start decorating. You can use markers or colored paper and add some pizazz to your chain.
The possibilities are endless and addictive. Once your kids get the hang of it they will be everywhere.
Good Luck and Merry Christmas!!
I don't think I'll get another post in by the 25th so I hope everyone has a great holiday with their family and friends and don't forget to make a craft or create some art.
I will be at our cabin between Christmas and New Year's but I plan to do a post or two from there.
God Bless
gail
|
|
---|
How to Make a Penguin Snow globe
Christmas Craft #7 Penguin Snow globe Ornament
Well here is the second most popular craft from Craft Day at school. We ended up running out of black pipe cleaners it was so popular. The idea is from Parents.com, I had to change it a bit to work with 120 kids. I know everyone likes a step by step tutorial so here it is:
Materials Required:
click on photo to see larger
I couldn't find 5 oz glasses like the original supply list called for. I did find "shooter" glasses at the Dollar Store so we used these instead.
I made a template for the kids to follow. You want to cut out a circle about 1/2 inch larger in diameter than the cup.
Then using pinking shears or decorative paper cutters, cut a nice scalloped edge all the way around.
Now the original instructions said to pierce the bottom of the cup with a tack,....well after cracking 4 cups in a row I gave up on that idea.
Thread your pony bead with your hanging thread and tie in a knot to make a loop.
Glue directly to the top of your cup with tacky glue.
While it is drying you can work on the penguins.
Take an orange pipe cleaner and cut in half. Now bend this in half.
Twist a bit together leaving the ends separate. These are your penguin feet.
Now take a full black pipe cleaner and wrap around a pencil nice and tight.
When you slide it off it should look like this.
Insert the orange pipe cleaner inside the black coil. About two coils from the top bend your orange pipe cleaner so it sticks out. This is your beak and those 2 coils at the top is the top of the head.
Take your white felt and cut a little oval. Glue on the belly of your penguin. The original instructions used a white pipe cleaner but I found it too fussy to stay in place.
Glue on some eyes.
Make a second penguin a bit smaller than the first. Cut your orange pipe cleaner about a 1/2 an inch shorter and scrunch down the black coil a bit.
I also used smaller eyes on this one.
Now the original ornament had a North Pole sign with the penguins but with these "shooter" cups I did not have the space for it.
Glue your penguins to the cardstock circle.
I have mine close together because of the size of the cup.
Add some loose sequins on the paper. I didn't glue these down as I wanted it to be more like a snow globe.
Run a bead of glue all around the bottom edge of the cup.
Put into place over the penguins.
The original instructions called for a silver pipe cleaner around the bottom. I find those metallic pipe cleaners difficult to glue for kids so we used a white pipe cleaner.
Measure how long you need then cut to size, leave a little extra to twist together in a circle. Run some glue around the base of the cup and then slide the pipe cleaner down.
We used some glitter glue to add some sparkle to the pipe cleaner.
Let the glue dry fully and then you have a cute little snow globe ornament.
Give it a try.
see you next time
gail
How to Make a Church Ornament
Christmas Craft #6 Church Ornament
We had our Big Christmas Craft Day on Friday at the school. It was a huge success mostly due to the large number of Mom volunteers on hand to help us out this year.
Thank you all again for coming out!
This was one of the crafts we did this year. It proved to be the most popular one.
Materials Required: Sorry I don't have a photo for this but the original one I took is sideways and I can't get blogger to rotate it no matter what I do to it in photoshop.
piece of wood, rectangular about 1"x 1 3/4". If you are only making a few you can probably cut the pitch for the roof directly, we needed 120 so we ended up cutting two parts for each church, it just made it faster during the prep stage.
sandpaper
white acrylic paint
craft foam
curling ribbon
colored bits of paper
doilies
tacky glue
glue stick
Sand the edges of your wood pieces.
We had to glue our roof onto our base.
Paint with white acrylic paint. You don't need to paint the roof as the craft foam will cover this.
While the Church is drying cut little bits of curling ribbon to make the windows and doors.
Cut some craft foam to make the roof of the church. Be sure to include an overhang on each side. It looks more realistic this way.
Glue on with tacky glue. Use an elastic band wrapped around to hold in place while the glue dries.
Glue on the little bits of cut ribbon for the windows and doors.
For a stained glass window you can cut out a piece from a doily.
Glue this on some colored paper, here I am using some leftover wax paper. In an earlier project we had taken coffee filters and colored them with washable markers, we then painted them with a glue/water mix. The markers run and produce incredible papers to work with. I kept the wax paper that was underneath them as the color transferred to it as well.
You can just use some colored paper.
Glue into place with tacky glue.
Cut a cross out of colored paper or the craft foam.
I had the kids cut two little sticks which we then glued together to form a cross.
Glue into place.
Taking a needle threaded with some gold or silver thread pass thru the craft foam at the top and then tie a loop for the hanger.
That's it, a cute little Church ornament. You can also glue some glitter onto the roof for snow as a finishing touch.
later
gail
How to Make an Angel Clothesline
Sorry it's been awhile but tomorrow is the BIG Craft day at school and I've been a little busy with prep.
Last year one of the crafts we did was this Santa clothesline. I had seen this in the Family Fun magazine about 5 years ago. It is still on the website here, but there are no templates. You can use mine if you want.
This year we are doing an Angel clothesline. Complete with Halo, cloud, songbook or Bible, wings, and gown. In these pictures I have a bell for an instrument but I couldn't find a source for 120 of them so in this tutorial we are making a harp.
Christmas Craft #5 Angel Clothesline
Materials Required:
click on picture to see larger
I usually find my mini clothespins at the dollar store. I can get 45 for $1.00.
You can use my template or make your own.
TEMPLATE
Using template trace out pattern pieces onto the felt. I used a light blue for the cloud. I always use a sharpie when tracing. When I go to cut the piece out I cut just inside the line leaving most of the black behind.
Cut out your shapes.
Using your colored paper cut out your harp piece and the little framed "Home Sweet Home". It is made up of two little rectangles, one a bit smaller than the other and just glued on top.
Add some detail to these pieces with markers.
Add some glitter, sequins, and beads to embellish your clothesline pieces.
Glue on your "Home Sweet Home" picture to the cloud.
Make a halo from a pipe cleaner. Cut your pipe cleaner to about 3 inches long or 1/3rd of the full stem and make a circle twisting in the ends.
For the song book take a little bit of sheet music, there is a lot you can download on line, and cut it to about 1 inch by 3 inches. Cut a cover for the song book from some colored paper. It should be the same size.
For a Bible you can print off some verses. For school we will have both.
Fold both pieces in half and fit together. Staple in the center of this fold.
Using a fine pen put on a title and a few notes if it is a song book. When your glitter and glue has dried on your pieces cut a piece of string about 30 inches or so. Make a loop on either end and using your clothespins hang up your angel laundry!
That's it for this one.
I will be trying to post a few more crafts tonight. This way I can just print off the tutorials from the blog for all my Mom volunteers to follow tomorrow. See I knew this blog was good for something!
see you soon
gail
Labels:
Christmas,
craft tutorial,
kids activities
Subscribe to:
Posts (Atom)