Sorry I've been quiet the last week but I was packing and travelling to the cabin in BC.
As always I'm always trying to come up with new ideas for art projects.
I was thinking about embroidery and how I could jazz it up a bit for the kids when I started thinking of combining a painting with embroidery detailing. This is the result of my experiment. The kids are eagar to try this out next.
I took some canvas fabric and pencilled in a desgin. I was thinking of faces so my daughter suggested a sun and moon combo. I plan on sewing this up into a little purse when I get home.
I then took acrylic paint and painted in my design. I could see the pencil faintly thru the paint which made it easier to embroider.
Add a little water to your acrylic paint to help it spread easier on fabric.
Set aside to dry overnight.
Taking full embroidery thread I embroidered in the details adding highlights to the eyes and texture where I wanted. Play around with light on dark and vice versa to really showcase the stitching. The canvas was heavy enough that I did not need a hoop.
That's it. I plan on folding it in half stitching up the side and bottom on the machine as well as adding a zipper at the top. I'll then braid a nice strap and viola! a new purse for my upcoming trip to Paris.
Please feel free to click on the pictures to see larger for the stitching detail.
Now the kids are set to do there projects, Allie is doing a new larger pencil case for school and the boys are making bags to hold Lego and DS games. I plan on posting their results so stayed tuned.
|
|
---|
Metal Tape
It all started with these foam swords.....well then we had to make some shields. So I brought out my metal tape and began contemplating all the projects you could use it for ........
Like this forged metal picture. I'm showing you 2 photos as the metal loses it's shine under the scanner.
Now you get it from the hardware store...usually near the metal ducting section. At Home Depot I find it with the duct tape but this stuff is real metal. It's thicker than foil and the adhesive they use is incredibly sticky. It costs about $12.00 for a 40 ft. roll and is about 2 inches wide.
I lay it out flat in pieces (don't take off the backing) and then using a dull pencil draw a design. The tape is heavy enough that the pencil etches the design into the tape.
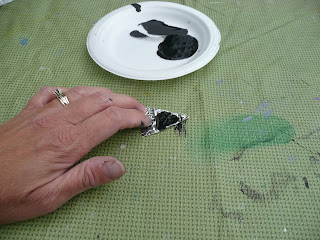
You can also antique or burnish it with a little acrylic paint. I use my fingers and rub it into all the little spaces.
Then using a paper towel remove as much paint as you want for an antiqued look.
I've also used it in my embosser for instant stickers. For a larger design you can use 2 pieces of tape side by side.
For the shields I cut a shape out of some cardboard edged it with duct tape and added a handle at the back.
The backing was then removed and the metal tape pieces placed onto the background. CAREFUL...this tape is really sticky.
and that's it. Once you start using this tape you'll find a lot of uses. The adhesive is sticky enough for virtually any surface..wood, plastic, metal, ceramic. It makes awesome labels for things like plant tags and it is much cheaper than buying metal embossing sheets from the craft store and it has the glue built in.
Labels:
art project,
kids activities,
metal tape
Drumroll please!
Wow....I am totally amazed by all your comments!
I was just expecting "please enter me" or "I'm in" .
......not all this !!
Thank you so much for your kind thoughts and gracious support...I truly did not know how much this blog was appreciated.
So after 124 comments and 7 direct emails we held the draw this morning.
My daughter Allie did the honors....
and the winner is Jodi Youngman.
Thanks again everyone for entering and I hope to keep blogging for another 2 years with lots of projects.
I was just expecting "please enter me" or "I'm in" .
......not all this !!
Thank you so much for your kind thoughts and gracious support...I truly did not know how much this blog was appreciated.
So after 124 comments and 7 direct emails we held the draw this morning.
My daughter Allie did the honors....
and the winner is Jodi Youngman.
Thanks again everyone for entering and I hope to keep blogging for another 2 years with lots of projects.
Labels:
giveaway
Giveaway
Well......my little blog will be 2 years old on Sunday and I've decided to mark the occasion by giving away the "bestest" art book ever.
I absolutely love, love, love this book!!!!
It's unusual in that it is so full of information and projects for teachers/parents. Not a ton of photos so it can turn people off at first glance but if you give it a good look you'll realize the wealth of info here.
I used to take the old edition out of the library continuously but then invested in my own revised copy when the late fees could have easily paid for the book 5 times over!!
It goes thru art projects based on region:
like Africa
Europe
Asia
Australia
Oceania
Middle East
The Americas (Central, South, United)
Canada
The Caribbean
I lost count at 60 but I'm sure it must have close to 100 projects detailed in it's 288 pages.
So if you are interested please leave a comment before midnight Sunday July 11th and I'll make the draw on Monday.
Good luck everyone and thanks so much for supporting me in my little blog adventure!
Labels:
giveaway
Zebra Resist
Here is another resist I was experimenting with yesterday. It is wax crayon on newspaper.
Using a reference photo I drew a zebra directly on newspaper using the stock pages.
It was hard to see so I added some lines in fine sharpie.
You then take a white crayon and color in where ever you want it to stay white.
Using black tempera I then painted over the crayon. With newspaper you don't want to over saturate it with water/paint as it will just tear on you.
I added some darker areas using a small brush with a black acrylic or you could use ink just to have some more contrast in the details.
To add some interest in the frame I added some strips of newspaper which I glued down and then trimmed.
I then glued down the resist.
I also finished another giraffe. I was trying a glue resist for this sample. I painted a undercoat in a light tan/yellow using tempera or wc.
When it dried I added the pattern of the print using regular white school glue.
Set aside to dry flat.
Then painted a coat of darker brown on top.
The glue resists the paint and the pattern shows up like this. Sorry I didn't complete the picture but when I'm developing projects for next year I'm just trying out as many ideas as I can.
Remember to visit me tomorrow for my first giveaway!
Labels:
glue resist,
pastel resist,
wax resist
The Giraffe Project
If you're kids are driving you crazy why not particpate in the One Million Giraffe Project.
I'm all for a project that is about creating artwork not by computer or thru any man made objects so if you get a chance check it out.
This particular giraffe is pastel resist, part of my summer research work and the kids at school will definitely be part of the One Million Giraffe project in the fall.
You need some heavy sketch or wc paper to start with. I use a really heavy paper that is white on one side and natural on the other. I get it for FREE from Costco.
If you go to the paper products section there is paper that they insert between the stacks of toliet paper packages and paper towel packages. It's usually lying on the floor or pushed to the side.
Costco just puts it in their recycle bin so I make it a point to pick up 2-3 sheets every time I'm there. It is quite large, 3.5 ft square or so. Just roll it up put it in your cart and you have some great material.
Print off some reference photos and draw out your design. If you can draw one from memory or your imagination have at it. But.....most artists use reference photos. This is one of those big myths of art that I usually reveal to my students to increase their confidence.
I usually use 3-4 and pick out different parst from each, I make whatever changes I want as part of my artistic license.
Paint a light coat of yellow and biege (tempera or wc) and then using pastels (white, biege, yellow) mark out the pattern of the giraffe's coat.
Come back in with some stronger browns and tans using your tempera disks or watercolor paint. I also added some shading for the shadows. You'll be cutting it out so don't worry about staying in the lines.
I also did a few leaves for the background.
Cut out your giraffe and the leaves and glue these onto a background paper.
You might have to weight it down to get it to dry flat. I put a layer of wax paper on top and then another art board weighted down with some books.
and that's it. I have another resist giraffe that is drying and will hopefully work out to show you next time.
I am pleased to be part of "get crafty!"s July roundup. Check out this amazing selection of kid's activities and projects here.
Labels:
kids painting,
pastel resist
Subscribe to:
Posts (Atom)