Tattoo

Family Snowman Portraits


These Family Snowman Portraits are the Christmas project currently being done by Grade 2.


I found a great deal on these primed canvases at Michaels last week, 10 for $14.99.  I think they are on sale this week for $19.99 which is still only $2.00 per child.  You can also find them at the dollar store.

You could also just do them on paper suitable for framing by the parents.


Draw in a horizon line in pencil.  After experimenting with the sample pieces I would make my horizon a little lower than the one in this picture.


Paint with acrylic in a nice sky blue.  Make sure to paint the edges as well.


Let dry.


While your canvas is drying cut out some circles from foam or sponge.

You need at least 3 circles, small, medium, and large.  I have some kids with large families so I will be cutting some long oval shaped ones so we can fit more snowmen on our pictures.


Taking gesso or thick acrylic paint (from the tub, tube, or a Folk Art Artist's Pigment brand) pounce in some snow on your bottom section.  You want to have some texture here.


Mix in a little bit of the blue and add a few touches...this helps distinguish the ground from the snowmen a bit.


You can also add some snow glitter if you want.  I added mine before my Mod podge coat and it was still shiny after.  You could also wait and add it into the Mod podge if you prefer.


Now using your sponges put in your snowman family...1 for each member.

Now you can line these up in any order....you can also put the Mom on one end and the Dad on the other with the kids in the middle.


Using colored paper add hats, mitts, ear muffs, scarves, buttons, eyes and noses.  A hole punch works well for the eyes and buttons.

Using sharpies you can add arms and smiles.  Make sure to add your smile first and then glue your carrot noses in place. (works better this way).

Glue into place with tacky glue.


I used my cricut for the letters.  My original plan was to stamp them in with paint but this was too tricky.  You could print some off the computer and cut into equal squares like tiles..that would also look nice. You could also add "the" if you wanted  (The Bartels)...we won't have the room on our canvases.
after thinking about it I've reconsidered and we will add a small "The" and a little "s".
I glued them into place and then covered it with a coat of mod podge...this secures all the paper bits and gives it a really nice shine.


This is my second sample.  Here I placed the snowmen higher up on the snow so you can see the full circle of the body...I like this better.

Another finishing detail we are going to do is add some little pompoms and make some of the hats or mitts in felt.  They will be attached after the Mod podge coat has dried.  This will add a little 3D touch.

See you next time.

SNOW Banner


Here is one of the crafts the kids will be doing for our 2010 Christmas Craft Day.  It is a repeat of one we did 4 years ago. (I have to wait 4 years before I can repeat crafts so the kids do not get any doubles).

It is based on a project by Leslie Johnston that was in "Pack o Fun" in 2004.

I made some changes and it is now a quick craft that we can easily cycle 150 kids thru lickety split.


I cut out pieces of posterboard that are approximately 6 inches square.

I like using blue.  I then trace out the letters SNW for the kids to cut out.  If you have more time you can get them to trace it out or have them design their own letters.


Using a circle template we then trace and cut out the snowman head.


The original design had scarves for the snowman but I found them hard for the kids to manipulate so we use hats.  I take some fleece fabric and sew it into a long tube on the machine.  I then cut it into sections.

The kids take a piece of yarn and tie off the top of the hat, roll up a brim, and slip onto the head on an angle. Using tacky glue secure into place.


We then cut out 2 eyes out of black paper.  Using a white crayon make a little highlight line in each eye.

Glue into place ensuring the highlight is in the same position for each eye.


Using disk tempera, paint on some rosy cheeks.


When the cheeks have dried use a sharpie to draw in a crooked smile.


Cut a carrot nose from orange paper, craft foam or painted paper.  Using a sharpie draw a few lines on your carrot.


Glue into place.


Make a hanger with a loop of ribbon and tape into place at the top of the S.  Then tape a longer piece of ribbon at the bottom of the S for hanging the rest of the letters on.  You may wonder why I didn't just use one long piece for the whole thing but I find the ribbon distracts from the S letter so I like it better this way.


We staple the top of the snowman hat to the bottom of the N to keep it balanced otherwise the snowman flops over and the banner doesn't hang right.


We also tie on a Christmas bell at the end.  I find these at Wal-mart, 21 bells for $6.00, in the Holiday section.

That's it, a great little door banner that is easy to make, perfect for our Craft Day.

Give it a try.

Easy Angel Carolers


This is a very easy Angel Caroler that we did last year as part of our "Christmas Craft Day".  (150 kids, 1 morning, 12 crafts)

This year Kindergarten is making them and I thought I'd share it with you.


I apologize for not letting the glue dry before the photos but I'm fighting for the light....not much time after school to photograph before it's dark!


You will need:
- a pattern template
- some cheap batting fabric (I like the sparkle)
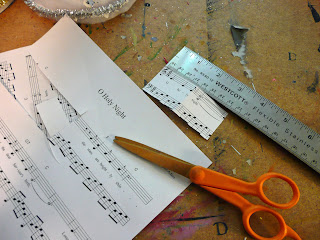
- some sheet music try here
- tacky glue
- a 2-3 inch Styrofoam ball
- flesh colored acrylic paint
- pink acrylic paint
- some garland
- a white pipe cleaner
- a fine sharpie
- some white cardstock or posterboard
- some sequins or embellishments


First you need to paint your Styrofoam ball.  We also added some glitter for a bit of sparkle.


After it has dried use your fine sharpie and put in the eyes (closed ) and the mouth.  Now you could paint these in if you wanted but I find young kids have more control with the sharpie.


Take your pink acrylic paint and using the end of a pencil dot the cheeks.


Take the pattern and trace and cut out of posterboard, cardstock, or manila tag.


Cut the same pattern out of the batting fabric. but this time do not cut out the notch in the center.


Staple your posterboard cone together.


Put glue all around the edges of your fabric on the wrong side. (non sparkle side).


Cover the cone and just tuck in the fabric in the center.


Take your white pipe cleaner and make a loop at each end for the hands.


Cut a piece of batting fabric 3"x7", lay your pipe cleaner in the center, put glue along one edge of the fabric, fold in half.


Take a 8 inch length of garland and wrap into a circle.


Glue onto the head of your angel.


Put some glue on the center of your cone and secure the head.


You may have to hold for just a minute while the glue sets up.....


Put some glue on the center of your arms.


Attach to your angel.  Try to make them come from the shoulder area...I find kids often want to have the arms coming out of the waist.


Now you can decorate your angel a bit with extra garland, sequins, snowflakes......


Cut out a strip of music about 3 inches long and the width of the bars.


Glue into place..I like to have the music facing out but you can also glue 2 strips together so you can see it from both sides.


If you want wings you can cut some from a gold or silver doily or even 2 petals from an artificial flower.

Secure on the back of your angel.


and that's it.

I hope your class makes a choir of Angels and I'll be back with more Christmas projects soon.

Take care.