Tattoo
Showing posts with label kids activities. Show all posts

How To Make an Alphabet Block Elf Christmas Ornament


Here is an oldie but a goodie....another craft for Christmas Craft Day, an alphabet block elf.

These can hang on your tree or sit on your mantle...you can make several and have them spell out a word like JOY, NOEL, MERRY.

Easy to make so follow along.....


MATERIALS REQUIRED:


- alphabet blocks, I get mine from the dollar store for $2.00 for 15 blocks
- red, green, blue, white, and yellow felt
- tacky glue
- 1 inch Styrofoam balls or wood beads
- small googly eyes
- small pompoms
- little bells (optional)
- acrylic paint in flesh and pink
- glue gun (optional)
- templates if needed


For Christmas Craft day we are using Styrofoam balls (more economical for 150 kids). 

Due to this we have to paint our head with flesh color paint in any tone that fits for you.

If you are using wood beads you can skip this step.


Using the end of a pencil dab on some rosy cheeks with pink acrylic paint.


Using tacky glue add some googly eyes and a pompom nose.


Using a red sharpie give your elf a smile!


Now we need to cut out some bits and bobs from our felt.  We are starting with the hat as it takes the longest to dry.

The easiest way to cut a hat is on the fold.  You can find a template here.


Add some tacky glue down one side.


Fold over and use some clothespins to hold together while glue is setting up.


Next I took a small cup and traced out a circle on white felt.  Cut out.  (you can use my template here).


Next we have to cut out the arms.  You need a strip that is approximately 4.5 inches or 11 cm long.

Round the edges a bit.


Now we have to cut out the legs which are about 3 inches or 8 cm long.

I cut out a shape like this. (see template if needed)


Then I cut out a narrow triangle out of the center.

Round your corners at the bottom.


Now we will put our elf together.

Put some glue on the top of your legs and place your block on top.  Make sure you have the side you want facing forward.


Put some glue on the top of the block and lay your arms on top, try to center it the best you can.


Put some more glue on top of the arms and stick on your white circle.


Now we will put on the hat.  Put some glue inside the felt hat.


Place hat on top of head and then add a pompom to the tip.  Initially I was going to tacky glue the head to the block but this didn't work so good so.......


So now I will have a few Mom volunteers manning the glue guns to stick on the heads.  We will also add these little bells I found at the dollar store to the feet with the glue gun as well.

When finished you can add a string for hanging if needed.


That's it...so easy and so cute.  I know you are just dying to make one or 3 or 6.


See you next time.

Nativity Banner


This is a project I did 2 years ago with Kindergarten.  We needed a quick project for the front display case and we had tons of felt and burlap.


It was amazing to see them all finished with each child adding their own interpretation to the Nativity.  Some had the Mary and Joseph outside with the sheep inside, one had the sheep on the roof....


Now this can easily be adapted for older kids just don't give them the templates....see what they can create on their own.


I had thought I had posted this project but I guess not so here is the How To:


You need the following:

- burlap
- a natural bamboo plant stake from the Garden store
- tacky glue
- felt in white, black, yellow, orange, green, dark blue, light blue, pink or a flesh tone, and brown
- glitter glue in gold and/or silver
- Pattern Template
- scissors


Cut your burlap in a rectangle 12x19 inches or 30x50 cms.

Fray your edges a little bit and fold over the top edge by 2 inches or 5 cms and either sew a pocket for your stick or glue one.

If you are not a sewer you can easily hot glue a whole classroom set.

I really love these natural bamboo stakes. A package of 24 is only $2.00, cut to fit with your pruning nippers. A branch from the garden would also be fine.


Download pattern and cut out the pieces.


Felt can be a bit tricky for Kinders to cut. Their scissors are usually not sharp enough (dulled from all that paper cutting) so I keep a set of classroom scissors for fabric cutting only....but this is also a lot of pieces so I enlisted the help of the Mom volunteers.

I sent the felt home with a couple of patterns and the #  I needed in a ziploc bag, I wrote down the due date as well.


We did the gluing as a class.  Put some wax paper down first as the glue can seep thru the burlap.

We did it step by step and I handed out the felt pieces as we went.


First up the manger, I asked them to place it down into position first so we can check where it is and then we start gluing.

Nothing worse then a manger roof too far down on the banner!


Add the star and then the cradle as well as the yellow halo for the Baby Jesus.


Add the body and then the head for Baby Jesus.


Add the bodies and heads of Mary and Joseph.


Add Mary's scarf and Joseph's hair/beard.


and then add the sheep.


Finally you can add some extra stars in the sky with the silver and gold glitter glue.  I always tell the kids "less is more" as they love their glitter!

As you can see my sidekick Tika is in on the action again and she ended up with some glitter on her feet.  You could add further embellishment if you wanted (eyes, etc.) but I kinda like them on the simple side.


Let dry and hang up with a piece of yarn tied onto the ends of your bamboo stake.


That's it.

Wycinanki


I recently presented at a Early Childhood Education conference in Edmonton, the theme of my session was Multicultural Art Techniques.  One of the techniques I discussed was Wycinanki or Polish paper cutouts. There are lots of examples in google images.

This "Tree of Life" theme is quite common, a symmetrical cutting done on the fold.
I also talked about amate cutouts from the Otomi people of San Pablito, ( Art for Small Hands recently did a post), which is also a symmetrical cutting.

These Wycinanki designs  were used to decorate the freshly white washed walls of farmer's homes in the spring in preparation for Easter.
I think they look terrific at any time and it's amazing what you can create with the simplest of materials. (Paper, glue, and scissors)


Not all Wycinanki is symmetrical "cut on the fold". 

This turkey (for all of you in the USA this week) which could easily be a Rooster or Peacock, it is also a very traditional design.


A symmetrical design is a good way to get started.  Take a piece of black paper, fold, and trace out a design using white crayon, pencil, or colored pencils.

If you want to use my designs you can find them here:

Tree of Life 1
Tree of Life 2
Turkey, Rooster, or Peacock


Now with young kids trying to cut this design can be difficult so I am all for cheating.  We will glue this fringe back into place at the end and this makes it so much easier!

On the pattern you will see where you can cut this decorative fringe frame section off so you can cut the inner design.

Fringe frames are quite common designs, many Wycinanki have quite elaborate ones and often more than one. 


For this fringe cut little "teeth" into the outside edge. 


Glue your design onto a backing paper.  Here I'm using white as it contrasts so nicely with my black cutout.
Glue the fringe back into place and no one will be the wiser.


Now it's time to add some color.  To mimic a painted folk art design add bits of colored paper, layering as you go.

If you fold your colored paper and cut 2 shapes at the same time you can keep that symmetrical look.

Glue and let dry.  Place a piece of wax paper on top and place a heavy book on your design to help it dry flat.


That's it.

Once you start let's see if you can just stop at one...I have some ideas for some Christmas themed ones so check back for the templates.


See you next time.

Sand Casts


After a few beach vacations it seems we have baggies of shells, "magic" rocks and other collectibles all over the house, time for an art project!


I took some recycled containers (we had takeout Friday) and added some sand from the sandbox.  Sift out any leaves or twigs that might interfere with your cast.

If you are doing a whole class you can also use those little Styrofoam bowls like I used for the sand candles.


I started off thinking we would do hand or foot prints but our sand was way too coarse for that.  We couldn't get a good impression so on to Plan B.


We pushed in a bowl shape but you could also form one with your hands, just digging out a form.


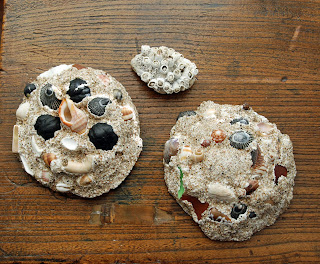
Then the kids started placing in their special shells, bits of sea glass and rocks.

You want to have the side you want to see facing down into the sand.


Once you have your composition the way you want it....it's time for the plaster.

Now you can pick this up at the hardware store or Wal mart.  At school I have it by the sack.  I use it to make stamps for ceramics as well as for projects like this.

You want to mix it up in an old recycled container that you will throw out when done.  I'm also using an old salad dressing cup for the measuring.


Mix well with a chopstix or old spoon.  Make sure it is nice and smooth.  You have about 20-30 minutes before it will harden.

Only mix up as much as you can deal with in that time frame.  For a class set of projects you are better to do up 2 batches than have it harden on you before you can dish it all out.


Scoop into your sand bowls carefully so you don't dislodge any of the treasures.

Let sit for an hour or so until it has really hardened up.

Remove from the sand and give it a quick scrub under the tap.


That's it......now you can use this method on your little collections!


Ryan wants to cast his rock collection but I'm going to try to get some finer sand so we can cast it in the shape of his hand.


We'll see you next time.