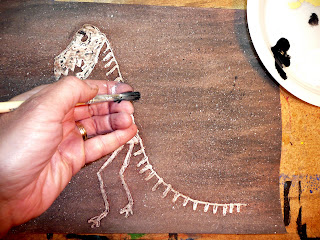
So here is the last of the Dinosaur projects...a glue resist.
The dried glue resists the paint and produces a pretty cool effect..lots of applications..I am already planning a neat Halloween project for Oct.
Now you can free hand your skeleton or use a template. This is for Kindergarten so I gave them all a pencil sketch to follow.
Materials Required:
- thick white cardstock or posterboard
- white glue or paste (recipe to follow)
- template (optional)
- paint
- paintbrush (large for background,small for cracks and vine)
-water container
- stamps (optional) I had some leaf ones made from thick craft foam
- splatter box
Paste Recipe:
If you are doing alot of resist work and don't want to use glue you can make a simple paste. You do need a squeezable container, like those generic condiment containers. I found mine at the dollar store for a $1 a piece. That advantage to using paste is you can make it the consistency you want. A firmer paste works better for detailed work.
1/2 cup water
1/2 cup flour
2 tsps alum or you can use a sprinkle of cloves or some wallpaper paste. This acts as a preservative.
Mix together, add more water for a thinner paste if desired. Fill squeeze bottle with mixture. Be sure to discard any unused paste. Mix up a new batch as required.
You can also add color to your paste using paint. For this project you want to keep it white for the bones.

Pencil sketch your design. If using the template you can tape it to a well lit window, place posterboard over top and trace the design.
Regular white school glue works but can be a bit runny...tacky glue works well but for a large group you may want to use paste.

Outline all areas with the glue or paste using the bottle like a pencil. For the kindergartners I had to ask them to keep the nozzle on the paper...that way they had more control over where the glue went.
We were using school glue so we had some ooze issues but I think it will add some character to all the different skeletons. Some filled in the head and pelvic bone and others just outlined it. If you fill in the eye socket by accident that is OK you can stick a black paper eye over top at the end.


Completed skeletons.
Let dry fully.
 Using tempura paint, paint over the resist. If the paint is too thick and covering the resist just paint over it with a little water to thin it out a bit.
You don't want to spend too much time painting over the resist as the glue or paste will start to break down. Just a few passes should do it. If you are unhappy with the color let it dry and then paint again.
Here I used a warm brown but then decided to darken it so I let it dry and then did a black wash.

If you want to make it look like rock or stone you can add some splatter. I'm doing this without a box but with kids you really want to use a splatter box. You can see one in use in this post.
I added cream colored splatter and black splatter.
You can make your own out of sponge or potato if you want.
Using some different green shades stamp on some leaves. Add a vine with a small paintbrush to connect the leaves.

Here is a test sample I was working on where I used a sponge. I think I like the vine better but you can cut out some vine leaf shapes out of the sponge.
That's it. Give it a try and consider glue or paste resist for other projects you may be planning.
see you next time
gail


No comments:
Post a Comment