Well I'm back after a wonderful holiday break and several cleaning/organizing days in the studio.
I've been thinking about polar bears a lot so I thought I would show you how to paint a few using either a stencil technique or contact paper.

Materials Required:
thin cardboard or chipboard from packaging
tape
scissors
watercolor paper or nice quality sketch paper (one with some tooth)
watercolor paints or tempera disks
paintbrush
plastic cling wrap
repositionable contact paper
gesso
polar bear template 1, polar bear template 2, if needed

Draw out some polar bears, use the templates if needed.
Transfer on to some thin cardboard.

Now you could use an exacto blade to cut these out but I prefer to use scissors. I just cut through at one spot and then cut out the shape in one go.

I then come back and tape together where I cut through to start.
This is more kid friendly than having to use a blade.

This will leave you with the positive and negative image.
Now you have a choice at this point.

You can trace them onto repositionable contact paper and use it as a sticker which will resist the paint.


Peel off the paper.

Place where you want and then paint your scene.
Leave to dry.

Or you can use the negative as a stencil.
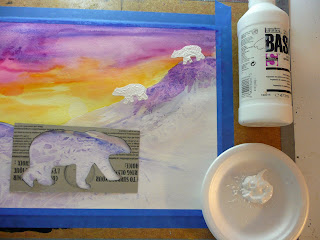
Plan out your scene. Paint over entire surface and then come back and stencil in your bears.

I like to add some color to my arctic scenes. With polar bears you have a lot of white so I try to do a sunrise/sunset with extra color or a snow scene with lots of shadow.
Here I'm doing a sunset. I'm adding some color on the horizon.

While it is still wet I'm lifting out a sun shape using a coin wrapped in some kleenex.


I then add more colors to my sky.

Before I start painting in my middle ground I make sure I have my plastic cling wrap handy.

I paint in my hills and snowdrifts and then while it is still wet I push my cling wrap in creating texture and then leave in place to dry.
Using cling wrap is one of my favorite techniques and I think it's perfect for a snow scene because it forms a sort of ice crystal type texture.

When dry remove the cling wrap...place your stencil where you want it. Squeeze out some gesso or thick acrylic or tempera paint on a palette.

Using a round brush pounce on the paint holding your stencil....you can tape it into place with some painter's mask to make it easier for the kids.

You are trying to get some good texture for that furry coat.

Set aside to dry.
With the contact paper one you need to remove your "sticker".

Then add an eye, nose and some shadows to define the bear.


No comments:
Post a Comment