Here are some felted puppets my kids made about a month ago.
Jeff (age 7) made the dog and it hasn't left his side since, except for a short stint at the textile session I presented in Saskatoon.
I get alot of requests for a felting tutorial and I have been reluctant in the past because there are lots of them out there as well as some terrific books.
These puppets are a little different so I thought I'd give you a mini tutorial about them.
When felting you need some wool fleece, I get mine from a weaving shop near Calgary called Shuttleworks. I always tell potential felters not to buy their fleece from the craft or fabric stores as they tend to have outrageous prices for very little fleece. I buy plain white fleece and then I dye it myself with Kool aid. You get wonderful colors and your fleece will smell like the Kool aid flavor as well which the kids find pretty cool.
To dye your fleece place one packet of kool aid into a canning jar and add a cup or two of boiling water. The amount of water you add depends on how much fleece you are dyeing.
Stir till the powder has dissolved.
Stuff some fleece into the jar.
You want to make sure it is completely immersed.
Let the fleece sit for a while. Half an hour or so...when you go back to check on it you'll find that they dye has been absorbed by the fleece and the water will be clear.
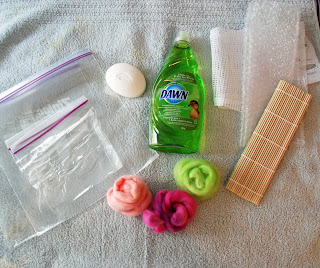
Now to start felting you need some fleece. An old towel to work on, some textured type mat to felt on to help build friction, ( I use sushi mats, bubble wrap, or the anti slip shelf liner with the bumpy surface), some soap either dish soap or bar, some warm water, and some fine netting. An old lace curtain from the dollar store will work or some tulle.
When felting you want to have that textured mat to lay your fleece upon and then the netting to lay on top of the fleece. The netting helps you suds up the fleece.
Now when making an item like a puppet, purse, slippers or a vessel you need to felt around something. It needs to be able to withstand the water and soap. For something that is felted flat for a pocket.... like a purse or slippers you can use a piece of heavy plastic, something like the sound insulation layer they use for hardwood floors or that white spongy plastic they use in packaging around electronics and such.
I have used rocks to felt little vessels like the one shown here in the picture, but I find rocks heavy for the kids to work with you also need a pretty big rock to make a decent sized puppet.
For these puppets I used these plastic cups I had bought a few years ago for Christmas. They were cheap and they had a nice textured surface so we didn't have to use an extra texture layer.
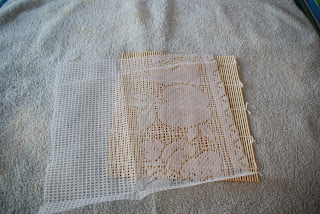
To start you layer on your fleece. It's hard to show in a picture. You don't want each layer running in the same way but criss crossed over multiple layers. For the puppets we used about 5 layers of fleece. You can see what I mean about layering from this photo of a flat design.
For the puppets we used a bar of soap as it was easy to just rub it on directly.
When the fleece is wet and soapy place your netting on top and start your rubbing or friction. I usually find it takes longer than the books say. The puppets probably took 20-30 minutes of rubbing to get the fleece to felt. I let the kids take breaks and we just added more water and soap when needed. If you find a hole starting to form just add some extra fleece and rub into place.
The tentacles for the squid puppet were formed by rolling lengths of wet fleece, forming little "dreadlocks". We then felted them into place on the puppet body.
When the fleece is stuck together and you can't pull it apart it's done. Roll your cup into a dry towel and roll back and forth several times. Leave on the cup to dry.
When dry you can remove from cup, trim the puppet on the bottom and sew on some eyes, tongues, ears, etc.
If you find a hole where the fleece "moved" during felting you can just add a stitch or two to close it.
That's it.
Unfortunately I didn't take a lot of pictures during the felting process so I hope you can get the idea from what I have posted.


No comments:
Post a Comment