 I've always loved miniatures. Creating little scenes, dioramas, putting in the unexpected. Here is a great little decoration you can make with your kids. It really isn't that hard and your kids will get totally wrapped up in setting up the scene
 .
.There is lots of different variations you can make on this. You can add whatever you want using store bought items or creating your own.
I personally like making my own however, I was in a rush to get this done so I could post.
I'll probably make some changes like making my own broom from twigs and grass, maybe even creating my own little pumpkin or candy treats for the little bowl.
Any how lets get started:
Materials Required:
carvable imitation pumpkins , (you could also make your own with paper mache but I got mine for about $6.00 so I thought why not), glue stick, tacky glue, decorative paper or newspaper or old pages from a book (lots of options here), some brown acrylic paint, toothpicks, assorted little items to decorate with

Decide what size of pumpkin you want to do your scene. I'll show you the small one as I want to work a bit longer on the big one.

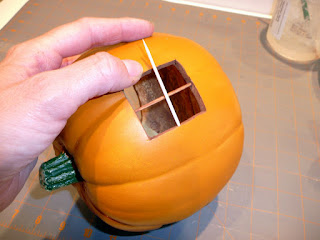
Using a thin saw or even a exacto blade cut out an opening in the back of your pumpkin. Cut out some windows too. I use the exacto blade for the windows so I can get a more precise cut. I also shave the edges a bit so they are a little rounder and there is no jagged little pieces of foam.

I decided to put panes in my windows. I'm using toothpicks.
Measure roughly how much of the toothpick is needed for the pane.

Take one end of the tooth pick and make a hole where the pane should be. Try not to poke a hole out of the pumpkin.
Do the same for the other end.

Cut the excess leaving a little bit on each end to go into the holes.

Stick the pointed end in as far as you can on one end then fit the other end into the other hole. Pull back a little on the first end if needed to get that other end into its corresponding hole. Secure with tacky glue if needed.


If you want cross panes repeat process for these. These tend to be a little tougher but its only toothpicks so if you break a few its no big deal.

Take your brown acrylic paint and paint the cut edges of the pumpkin. I choose brown you may want a different color.

Make sure you paint the window edges and the panes. I also painted the floor. I'm going to add an area rug but by painting it first it looks like a hardwood floor.

Now on to the interior, this is where your little designers can help with their small fingers. Choose a wallpaper. You can use newspaper, scrapbooking paper, I decided to use the pages of an old book I had. I usually pick up some old books at the library they are discarding just for crafting purposes.
Cut into strips and use your glue stick.

Try to overlap the strips. I'm doing the upper wall area and the ceiling.

This is where your kids little fingers may do a better job than yours.

Completely cover your chosen area.

For the bottom part of the wall I'm going to measure my strips this is so I'll get a nice even edge all around the interior of the pumpkin.

I'm using some decorative scrapbooking paper for this with a small repeating pattern.

Using your glue stick glue into place.

At the edge go past it if you need to and then trim.

I decided to put in a chair rail for the division between my two wallpapers. I picked out a narrow coordinating ribbon for this.
Run a bead of glue on the line where you want the ribbon. I put my division right at the bottom of my windows.

Put your ribbon in place and trim the edges.
Now its starting to look like a little house.

To make a simple table cut a toliet paper roll to the height you desire. Trace around it on some thin cardboard like a cereal box. Cut out the circle. This will be the top of the table.

Put a bead of glue around the edge of the cardboard and stick the toliet paper roll to it.
Measure out some fabric for the tablecloth. I want some nice folds so I'm making it bigger than the table, I can always trim later if I need to.

Put lots of tacky glue on the top and sides of roll.

Put cloth into place. If you want nice folds you can clothespin it into place. Let dry, trim if necessary.

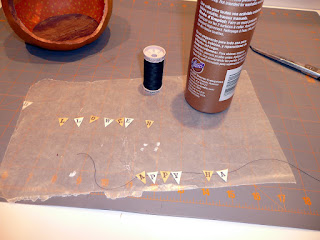
Now you can decorate. Here I get to finally use my $1.49 mini alphabet stamps. I'm making a little banner.

I'm then glueing these to a piece of thread. You can also print off little images from the computer for pictues or have your kids draw you some. You can make little picture frames from toothpicks or cut a mat out of some cardstock paper.

I made a throw rug from some fabric and I added some spiders and a skelton. This is where you can have fun trying to recreate household items in mini. Ther are lots of websites and blogs with ideas for this. My favorite is Casey's minis.

This is my attempt at atmosphere photography. I guess I have a lot to learn yet.

You never know what you'll find inside!
I don't know if these pictures give this little pumpkin justice I'll try to take some in daylight tomorrow.
See you next time
gail


No comments:
Post a Comment