


So these are the mini gardens I finished up today for the kids to give to their teachers tomorrow....on the last day of school...FINALLY!!!
I can't wait for some extra time to do some painting and great tutorials for this blog.

I promised to show you how to make these gardens so here we go.......

Here are the houses I buy at Christmas. These are from Walmart and I think I paid $3.00 a piece.
If you are painting a plain one the first thing you want to do is brush it with an old paintbrush. This gets off the excess dust as well as some of the extra plaster bits that shouldn't be there.
 Start painting...I use Folk Art acrylic paints. Now when you start to paint you want to work with the largest areas first and then work your way up to the trim. This saves in the touch ups.
When you reach the snow bits on the roof and the ground you want to paint these green like moss. I usually paint it a dark green first like "thicket" and then pounce on some light Hauser green and a little bit of yellow. This adds depth to your trees and moss.
Paint the inner sills of the windows black. This hides them a bit.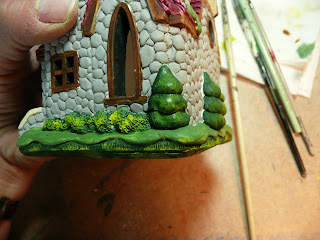
If you can't get all the little spaces don't worry the glaze will take care of it.
Now it's time for the antiquing glaze. You want a little bit of paint, I usually use Brunt Umber...add some float medium just to the side of your paint....next add a few drops of water....mix together in a small amount to make your glaze.

You then want to paint the entire house with this watery glaze. It will fill in all the little spaces and add depth to shingles, stone etc. It also covers all the little mistakes.
It tones down the colors to make them look more realistic.

Here is red roof getting the antiquing treatment.

For stone work you may want to use a bit of black paint for the glaze. It fills in all the grout lines and make it look like real stone or tile.
When finished let dry and cure. You are supposed to wait 24 hrs but sometimes I cheat if I am in a rush. I just have to be careful that the paint doesn't start to lift.
When dry cover in a coat of Duraclear glossy and set aside to dry.
While your house is drying find some nice flat pebbles. This will be your address marker.
Using a fine paintbrush make up an address for your house.....something like Lilliput Lane, Dragonfly Manor, Barnacle Bay.
Now you need a nice planter for your garden....something with a low profile but large enough to plant a few flowers and have space for your house. I use these terracotta planters...they are 16.5" in diameter and are about 8 inches high.
Put some large pebbles in the bottom for drainage.

Plant some flowers and herbs in a semicircle around the back of your planter. You are leaving space for your house and pathway in the front.
Try to choose plants that will stay small...only about 12" high at the max. Look for ones with small leaves and flowers to fit with the theme.

I usually pick up some extra park benches at Christmas time to go with the houses but neglected to do so this time.
I place decorative rock in the back of the planter where the house will sit and then add a pathway. And that's it a cute little mini garden that makes a great gift. My kids like to set up little mini scenes in the regular flower bed as well. It's amazing what you can come up with!

Materials Required:
a house...now I purchase houses at Christmas time specifically to make these gardens but you can find some at garage sales or make one out of a fence post like I described in this post. If you house has snow on it you can easily paint it to be moss.
paint
paintbrushes
sealer, I use Duraclear glossy
planter
soil
flowers
large pebbles
small decorative rock
twigs

Here are the houses I buy at Christmas. These are from Walmart and I think I paid $3.00 a piece.
There are some craft stores that sell these all year round so keep an eye out. Otherwise you can make a wood one or modify a secondhand house from a Christmas village.

If you are painting a plain one the first thing you want to do is brush it with an old paintbrush. This gets off the excess dust as well as some of the extra plaster bits that shouldn't be there.
 Start painting...I use Folk Art acrylic paints. Now when you start to paint you want to work with the largest areas first and then work your way up to the trim. This saves in the touch ups.
 Due to the white chalky nature of the plaster you will find your colors appear somewhat garish. If you try to keep to traditional house colors you will be OK once the final antiquing coat goes on at the end.
If you water your paints down a little you will get better coverage as the plaster soaks up the paint very fast.
If you water your paints down a little you will get better coverage as the plaster soaks up the paint very fast.

When you reach the snow bits on the roof and the ground you want to paint these green like moss. I usually paint it a dark green first like "thicket" and then pounce on some light Hauser green and a little bit of yellow. This adds depth to your trees and moss.
Paint the inner sills of the windows black. This hides them a bit.

If you can't get all the little spaces don't worry the glaze will take care of it.
The glaze also hides any imperfections in your painting.

Now it's time for the antiquing glaze. You want a little bit of paint, I usually use Brunt Umber...add some float medium just to the side of your paint....next add a few drops of water....mix together in a small amount to make your glaze.

You then want to paint the entire house with this watery glaze. It will fill in all the little spaces and add depth to shingles, stone etc. It also covers all the little mistakes.
It tones down the colors to make them look more realistic.

Here is red roof getting the antiquing treatment.

For stone work you may want to use a bit of black paint for the glaze. It fills in all the grout lines and make it look like real stone or tile.
When finished let dry and cure. You are supposed to wait 24 hrs but sometimes I cheat if I am in a rush. I just have to be careful that the paint doesn't start to lift.
When dry cover in a coat of Duraclear glossy and set aside to dry.

While your house is drying find some nice flat pebbles. This will be your address marker.
Paint with a few coats of a light acrylic color.
Let dry.
Let dry.

Using a fine paintbrush make up an address for your house.....something like Lilliput Lane, Dragonfly Manor, Barnacle Bay.
The secret to using a fine liner paintbrush is to have very thin paint. Add water to black or brown to letter your sign. I then add some flowers or a vine.
Let dry and cover with a coat of Duraclear as well.
Let dry and cover with a coat of Duraclear as well.

Now you need a nice planter for your garden....something with a low profile but large enough to plant a few flowers and have space for your house. I use these terracotta planters...they are 16.5" in diameter and are about 8 inches high.
Put some large pebbles in the bottom for drainage.

Plant some flowers and herbs in a semicircle around the back of your planter. You are leaving space for your house and pathway in the front.
Try to choose plants that will stay small...only about 12" high at the max. Look for ones with small leaves and flowers to fit with the theme.

I usually pick up some extra park benches at Christmas time to go with the houses but neglected to do so this time.
I decided to add a fence to the pathway. I found a bunch of sticks on the thinner side and cut them all to about 4 ".

I place decorative rock in the back of the planter where the house will sit and then add a pathway.
This time I added my twig fence as well.
Put your address marker near the front.
 And that's it a cute little mini garden that makes a great gift. My kids like to set up little mini scenes in the regular flower bed as well. It's amazing what you can come up with!
Take care and I'll see you next time.
gail


