Tattoo
Showing posts with label fish. Show all posts

Fish Prints


Well things got a little fishy yesterday as Grade 2 did Gyotaku, traditional Japanese fish printing.


Here the fabric print is sewed onto a enviro grocery bag.  Mine had a logo on the front so I just turned it inside out.


Here are some of the paper prints.  You can see we had a lot of Rainbow Fish!


So you need a fish, I got mine from the supermarket the day before.  It was not gutted.  This made for a better print with a full fish.  We used tilapia as they are easy to find and the have a really nice scale for printing.

-and no I didn't realize the headline for this photo ahead of time!


Now the traditional method is to use India ink but I found it was just too watery for a good print so we used acrylics which also gave us a permanent print on our fabric versions.


Paint your fish.


We did our paper print first.  Lay your paper on top of your painted fish and gently press.  You are trying to get a good outline so I would ask the kids to find the tail, the mouth the eye, etc.


Lift and set aside to dry.


Next up is the fabric print.  We placed cotton muslin on top of the fish, we did not repaint it in between, the paper print blotted away the excess paint.

The kids would press down on the fabric amazed by the scale detail coming up.


Lift and set aside to dry.

Now I had 3 fish and I would wipe each one off with a baby wipe in between as well as place it in a tub of water for a quick dip before the next student would begin painting.
When the print is fully dry you need to run it through the washing machine or else your prints will smell.  You don't have to worry about the paper ones, no fishy smell there!

Some kids even had a scale become embedded in there paper versions, very cool!

That's it, now I have 23 more grocery bags to sew so I'll see you next time.

Painted Fish


We started an Under the Sea unit with Kindergarten. I wanted to brighten up the display wall so I had them paint tropical fish.


Here is our display wall and the ocean we set up.

Please feel free to click on any picture to see larger.


Materials Required:

white poster board
bright colored paint....we used liquid tempera
fish templates made from cardboard
white paper
black paper
glue stick
scissors
paintbrushes


I first had the kids paint the main body color for their fish.

I had bought some neon colored paint but unfortunately it turned out to be more like fingerpaint "paint". I ended up mixing it with liquid tempera with the same base color....fingerpaint is not very opaque.

Let dry.


I took some light cardboard and made some fish templates. These are quite large so I can't post them on Google Docs for you.


The kids then chose a template and traced it onto the back of their painted paper.

The large size of the template made this a bit of the challenge for kindergartners...a good challenge for their fine motor skill development.


They then had to cut this fish shape out....another good exercise to develop scissor skills.


Using a smaller paintbrush the kids painted on the finer details of their fish...I had some reference photos but the kids pretty much had their own ideas. It was amazing to see these fish develop.


I then had the kids trace out a large circle from the white paper and a smaller circle out of the black paper. They cut these out to form the eye of the fish. We glued them on with a glue stick.

I can't tell you how many were perplexed that the fish would only have one eye!


That's it. I saved all the leftover painted paper scraps as we will be making a "Rainbow Fish" as part of the "Under the Sea "unit.

see you next time

gail

Tropical Fish Pastel Resist


It must be the memories of snorkeling in Maui but I have fish on the brain...bright..flourescent..incredibly patterned fish. Here is a great project. It is my favorite use of pastel resist as it mimics the way light appears underwater.
I'm doing with this Grade 3 tomorrow, but you can easily do this with all grades varying how much detail you require.
You might want to spend some time looking at fish on google images or in the library to get a sense of the colors and variety out there...get those creative juices flowing.
Materials Required:
white paper, I used mid weight sketch paper
oil pastels
blue tempera paint
paintbrush
pencil
reference images


Using your reference images draw out a fairly large fish shape. Try to fill the page. In the past I have had kids draw fish, octopuses, squid, jellyfish, turtles, even a mermaid or two.
You define what parameters work for you.


Color in your fish with oil pastels. You want to choose bright colors...oranges..yellows ,etc.
The only color you don't want to use is blue. Make sure any areas the kids want to stay white are covered with white pastel.


Take your nice picture and crumple it in a ball. You want it fairly crumpled but in a gentle way...you don't want to tear or make any holes in your paper.
Now uncrumple it and smooth out flat.


Using blue cake tempera paint over your design. The pastel will resist the paint and bead up. The crumples and wrinkles will also show up after painting. This gives your piece that underwater look.
Let dry..mount if you wish and there you have it a great art project with an "under the sea" theme.

Give it a try!
see you next time
gail

Another Day Another Painting


It was supposed to be a rainy day today but low and behold the sun came out. A perfect opportunity for another practice session on the deck.

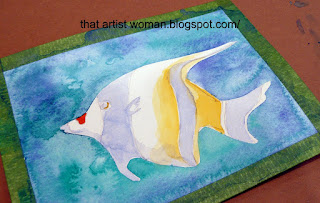
Found my reference photo....decided to do another fish. Made my sticker again and started painting. In the background were out of focus coral formations and plant life.


When finished the background off with the sticker to concentrate on the fish and the details.

I found this one difficult due to the iridescent detail on the photo. I thought I was done and had all the border tape taken off except the bottom when I decided that the area under the fish needed to be darker.


After I scanned this painting into the computer I checked my values by converting it to black and white. Low and behold I was missing a really light value so this painting is a bit flat.

Well that's why I keep practicing.


5x7 140lb wc paper
See you next time,
gail

One way to mask

I thought I try to do a tutorial today. Here goes nothing.

Near the end of the school year, one of the Grade 5 teachers asked me to do a lesson on surrealism, specifically to have the kids paint their own copy of Rene Magritte"s Golconde. Well I fussed awhile over how I was going to do this.

They needed to mask several duplicate shapes. That way they could do a light airy background with watercolor washes and then do more detailed work in the masked areas with colored pencils, markers, etc.

Masking fluid for 28 kids was just not practical given the amount of area needing to be reserved. Asking them to preserve their whites with their brush skills in multiple areas identical in shape was also not going to fly, I could see the tears already.

Tape seemed the only practical approach but we couldn't use exacto blades to cut our shapes. Normally you place tape down on your area, sketch out your shape and then using a blade cut away the excess without harming your paper.

So I came up with this masking tape sticker idea. It works so well I use it now for all my paintings where I need a large masked area or where I require a very clean line.


You need painter's masking tape, it can be green or blue(green is cheaper). Take a piece of wax paper and lay several pieces of tape on the wax paper. DO NOT PRESS FIRMLY DOWN, light touch only or else you'll have a tough time removing your custom made sticker.


With pencil draw the shape you require to mask off. If your shape is larger than the width of the tape just overlap 2 or more pieces. I outlined these with marker so you can see them.


Then you cut out the image with scissors including the wax paper backing. If you want multiplies of the same image you can use it as a template and trace around it.


When you are ready to use your sticker remove the wax paper backing...


and stick onto your paper or canvas. Now you can press FIRMLY and make sure you get all the edges.


Paint over your sticker while you lay down your background washes.


Let your background dry completely...you have to resist the urge to peel off your sticker too early. Once fully dry carefully pull off your sticker to reveal your pristine white area.


Now you can add color to your image to finish your painting. The masking sticker gives you a nice clean edge around your image to play with instead of trying to paint in your background after the fact.


And here is the finished painting which also qualifies for my daily practice for today!!
5x7 140lb wc paper